Techniques for Painting with a Sprayer
Using an airless paint sprayer is actually quite simple, but before you get started spraying, read the operating manual and review all safety precautions for your sprayer. Be sure to properly prepare the surfaces you’ll be spraying, and protect anything you don’t want to spray. Follow these pointers below and you’ll be well on your way to spraying success.
Practice First
It typically takes some practice time to become comfortable with the spray techniques that produce the best quality finish, so if you are new to using a paint sprayer, practice first by spraying water.
- Choose a practice area such as a garage door or other large flat surface that’s safe to spray with water.
- Using water, follow the start up procedures in your sprayer's manual.
- Once the unit and gun are primed with water, engage gun trigger safety and install the spray tip and tip guard; then practice your spraying technique on your chosen practice area. See your user manual for details
Select the best pressure setting
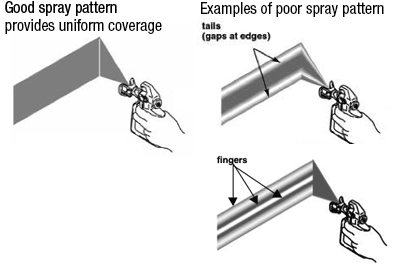
Use the pressure control knob to set the spraying pressure to achieve a good quality spray pattern. (See the illustration to the right). When the pressure is set correctly, there should be no runs in the pattern and the pattern itself will be smooth. Before painting on the actual surface, test the spray pattern on some scraps of cardboard or other area.
- Start with a low-pressure setting and trigger the gun quickly – if the spray pattern is full, you’re ready to spray. In most cases, however, the spray pattern will not be full on the first try. For example, a gap may exist at each end of the pattern, or the pattern’s edges may appear heavier than the middle (see example of poor spray patterns).
- If the spray pattern is not full, increase the pressure setting slightly and test again. Continue this process of increasing the pressure setting and testing until the desired pattern is achieved.
(Note: when using paints or other coatings, proper spray tip selection is important. If the maximum pressure setting is reached and the spray pattern still is not suitable, you may have the incorrect tip size or the tip may be worn and has to be replaced – see spray tips for more information.)
Tips for Spraying Success
Use the following guidelines to help you learn proper spraying techniques that will produce even coverage and a quality finish.
Keep your distance consistent
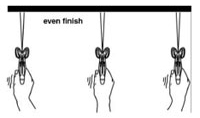
Start by getting comfortable moving the spray gun and learning to maintain the recommended distance from the surface. When you spray, hold the gun 30 cm (12 inches) from and perpendicular to the surface you’re spraying. Move your arm while keeping the gun pointed straight at the surface being painted – don’t fan the gun, as spraying at an angle can cause an uneven finish. Instead, flex your wrist slightly at the beginning and end of each stroke to maintain proper gun position.
A good exercise to get the feel for the proper gun movement is to hold the spray gun with the tip guard installed about 5 cm (2 inches) away from the wall and move the gun back and forth (horizontally) along the wall, all the while maintaining that 5 cm distance. Don’t actually spray; only focus on gun positioning and flexing your wrist to maintain correct distance. Once you are comfortable, increase the distance to 12 inches and practice a few more times. Pay particular attention to the gun position at the beginning and end of your reach – if you don't maintain uniform distance and flare out at the beginning or end, the spray pattern will start wide, then narrow and finally end wide.
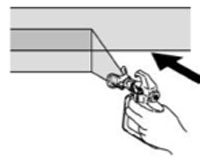
Work within your reach
When you spray, only work within the area you can easily reach while maintaining proper spray gun position. Don’t angle the tip at the end of your reach to spray further.
Properly triggering the spray gun
To avoid excessive material at the beginning and end of each stroke, always have the gun moving before you pull the trigger and continue your stroke after you release the trigger.
Overlap the passes
To ensure an even amount of paint on the surface, overlap each spray pass by 50 per cent. To achieve the proper overlap, aim the spray gun so that the tip points at the edge of the previous spray pass. When spraying on broad, open surfaces such as ceilings and bare walls, spray the outside edges first; then spray the middle.
Spray into corners
To properly spray inside corners such as where two walls meet, aim the spray gun directly into the corner, spraying each of the adjacent walls that form the corner evenly and in one pass.
Related Products

Related Projects
Shutters
With a fresh coat of stain or paint, decorative shutters greatly improve your home's curb appeal while preserving and protecting them from sun and weather damage.
Sheds
Sheds are great for storage. Just like your house, your shed can fade over time. Graco sprayers make it easy to freshen its appearance with a new coat of paint or stain.
Railings
Railings take a lot of abuse. Keep them looking their best with a fresh coat of paint or stain to preserve and protect them from the sun and weather.