Xtreme Sprayers Troubleshooting Advice
Frequently Asked Questions
- Clear air line; increase air supply.
- Check that valves are open.
- Clean hose or gun.
- Clean rod; always stop pump at bottom of stroke; keep wet-cup filled with compatible solvent.
- Clean or repair air motor. See motor manual.
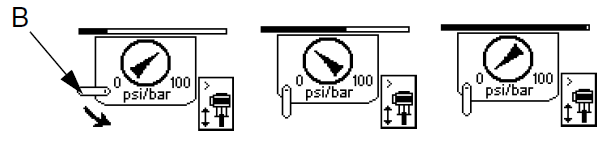
- If pump runaway occurs, the runaway solenoid will actuate, stopping the pump. The LED will flash and the display will indicate a runaway condition.
- To reset runaway monitor, close master air valve. Wait for air to completely bleed off the air motor before going to step 3. The screen will change to indicate this, as shown below.
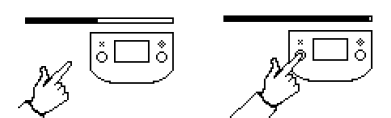
- Press (X) to clear the diagnostic code and reset the runaway solenoid.
- Open master air valve to restart pump.
NOTE: To disable runaway monitoring, go to setup mode and set runaway value to 0 (zero) or disable.
- Clear air line; increase air supply.
- Check that valves are open and clear.
- Clear hose or gun; use hose with larger ID.
- Open De-Ice control; see manual.
- Clear or service intake valve.
- Adjust intake spacers, see pump manual.
- Clear piston valve; replace packings.
- Refill supply and prime pump.
- Clean suction tube.
- Reduce viscosity.
- Adjust intake spacers, see pump manual.
- Clear piston valve; replace packings.
- Clear or service intake valve.
- Stop pump.
- Open De-Ice control; see manual.
- Service lower, see pump manual.
- Tighten. Use compatible liquid thread sealant or PTFE tape on connections.
- See gun manual; read fluid manufacturer’s recommendations.
- Adjust fluid viscosity; read fluid manufacturer’s recommendations.
- Service spray gun.
- See spray gun manual.
- Verify air pressure is 20 psi or greater.
- Increase air pressure to 20 psi or greater.
- Reverse the poppet valves, and see if problem moves to opposite side.
- Make sure o-ring and backup ring do not remain in the end cap casting.
- Clean or replace poppet valve.
- Problem poppet is typically opposite from where motor stops, because at the last changeover this poppet stuck open, preventing the next changeover.
- Remove air valve cover and check for binding/sticking of air valve cup/carriage or piston valve.
- Be careful removing the gasket.
- Remove air valve cup/carriage and/or piston valve, check for nicks or burrs, grease and reassemble.
- Replace air valve cup/carriage or piston valve.
- Remove air valve cover and check for binding/sticking of spring loaded detent.
- Be careful removing the gasket.
- Remove air valve cover and spring loaded detent.
- Clean, inspect, grease, and reassemble.
- Stall air motor under load in the middle of the stroke, remove top cover and check for leak through poppet muffler on top cap plate, and/or for leak through poppet muffler in bottom motor cover.
- Remove and clean poppet valve.
- Make sure o-ring and back-up ring do not remain in end cap castings prior to re-assembly.
- Stall air motor under load in the middle of the stroke, check for air exhausting from rear main motor exhaust.
- Replace motor piston o-ring.
- Stall air motor under load in the middle of the stroke, check for air exhausting from rear main motor exhaust.
- Remove air valve cover and check for binding/sticking of air valve cup/carriage.
- Be careful removing the gasket.
- Replace air valve cup.
- Replace valve plate seal.
- Stop spraying for a few minutes to see if motor speed returns to normal.
- Reduce pressure, cycle rate, or duty cycle of motor, and/or turn the de-icing control knob counter-clockwise to open.
- Low-Noise motors will ice faster than De-ice models. Convert to de-ice muffler by removing diffuser and deflector.
- Add coalescing filter with auto drain if models w/ built in air controls.
- Verify air supply and line size.
- Increase air supply, remove any restricting connecting devices.
- Air line minimum size of 3/4 in. should be used.
- See system manual for air consumption data.
- Remove poppet mufflers and check for proper changeover.
- Replace poppet muffler on top cap plate, and/or poppet muffler in bottom motor cover.
- Add oil to air filter cup or add an air line oiler.
- Remove poppet mufflers and check for proper changeover.
- Clean or replace the poppet valve.
- Problem poppet is typically opposite from where motor bounces, because the opposite poppet valve is slightly leaking, preventing proper changeover.
- Inspect piston valve for damage and proper orientation.
- Replace valve body or entire air valve assembly.
- Inspect piston valve for damage and proper orientation.
- Replace valve body or entire air valve assembly.
Note: 20 psi (140 kpa, 1.4bar) or greater needed to run NXT air motor.
- Remove air valve cover and check for binding/sticking of spring loaded detent.
- Be careful removing the gasket.
- Replace spring loaded detent.
- Remove outer valve cover and verify four 3/8 -16 x 4" screws, are tight to 20 ft-lbs (27.1 N•m.)
- Replace flat gaskets.
- Apply grease to gasket surface prior to re-assembly.
- Disassemble and inspect.
- Remove extra bumper.
- Verify air supply is present, main air valve is on, turn regulator knob clockwise to desired set pressure.
- If regulator knob is locking style, pull out before adjusting.
- Rebuild with regulator repair kit.
- Replace gasket or seal repair kit.
- Remove, inspect for damage, grease and reassemble.
- Replace regulator valve spool if damaged.
- Remove air control and install another regulator to motor air inlet port to see if problem remains with the air motor.
- Replace seals with, motor seal kit.
- Check de-icing control knob.
- Close de-icing control with knob or flat blade screwdriver.
- Verify input air pressure, fluid supply, fluid output, and runaway set point.
- Verify air pressure has been removed, wait 30 seconds then press reset.
- See Runaway, in the manual.
- Remove outer valve cover and solenoid to see if pin is fully retracted.
- Replace solenoid.