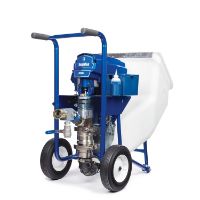
ToughTek CM20 – Setup
Here is a step by step video of how to set up your CM20 continuous mixer.
Assembling of the CM20 Unit
- Unfold cart legs and stand cart upright. *
- Install frame safety pins at front and rear of cart.
- Using a two-person lift, place the hopper on top of the cart frame. Secure the hopper to both sides of cart using the hopper ring pins.
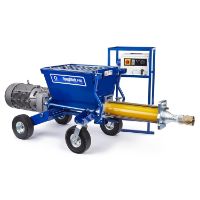
- Fully insert the material dosing auger shaft into the rear end of the hopper.
- Insert mix shaft into mix tube. Install shaft and tube onto hopper.
- Align mixing shaft pins to slots in the material dosing auger shaft and verify that pins and shaft are fully engaged.
- Firmly connect mixing tube to hopper. Secure mixing tube toggle latches.
- Lift the motor assembly so that it connects to the material dosing auger shaft. Immediately secure the motor to the hopper with the motor alignment pin. Ensure the pin has slid completely into place. Slide motor alignment pin washer over the end of the alignment pin. Secure alignment pin with motor alignment pin clip.
- Engage the rear toggle latch on the rear cart leg. Secure with rear toggle latch clip.
- Connect motor power cable.
*Notice: During assembly, the cart could collapse and crush fingers and other body parts. To avoid possible injury, make sure all clips and pins are securely in place and the mixer is on level ground.
*Notice: Be sure to properly support the mixer with a two-person lift during transport. Do not suspend from crane or hoist. The mixer is heavy and can crush fingers and other body parts.
Operating of the CM20
- Verify that the front leg hitch clip is installed and the hopper is secured to both sides of the frame with hopper ring pins. *
- Verify that the motor toggle latch, located on the rear cart leg, is engaged with the motor mount and secured with a rear toggle-latch clip and frame safety pin.
- Verify that the motor is securely mounted. The motor alignment pin must be installed and secured with a motor alignment pin washer and motor alignment pin clip.
- Verify that switch is in the off position, and then connect the motor power cable.
- Verify that both mix tube toggle latches on mixing tube are latched with their locking tabs engaged.
- Verify that the hopper grate is installed with the bag breaker pointing up. Ensure the hopper grate is secured with the grate retaining screw. **
- Position the discharge nozzle of the mixer over a pump hopper, wheel barrow, or other receptacle. The mixer should always be used on a horizontal surface so it is secure and stable.
*Notice: During setup, the cart could collapse and crush fingers and other body parts. To avoid possible injury, make sure all clips and pins are in place, ensure the mixer is on level ground, and always complete steps 1 and 2 before beginning setup or moving equipment.
**Notice: During setup, the cart could collapse and crush fingers and other body parts. To avoid possible injury, make sure all clips and pins are in place, ensure the mixer is on level ground, and always complete steps 1 and 2 before beginning setup or moving equipment.
Connecting Water to CM20
- Close the water accessory shut-off ball valve
- Ensure the water supply pressure is between 30-100 psi. The water pressure regulator has been preset to 30 psi and does not usually require adjustment. *
- Connect water supply hose to water supply inlet.
- Turn on water supply.
*Note: The water pressure regulator reduces the supply pressure to a constant value so that the water metering valve does not need to be adjusted due to fluctuations in supply pressure. The water pressure regulator must be set below the minimum pressure expected from the water supply(s) used, and if necessary can be set down to 25 psi (1.6 bar, 0.16 MPa).