Xtreme XL Maintenance Schedule
Maintenance Schedule
- For over night shutdown, stop pump at bottom of its stroke to prevent fluid from drying on exposed displacement rodand damaging throat packings. Follow pressure relief procedure.
- Flush, outlined below.
- Relieve pressure, outlined below.
- Check packing nut.
- Adjust packings and replace TSL as necessary.
- Torque to 25-30 ft/lbs.
- Drain water from air filter.
- Clean suction tube using a compatible solvent.
- Clean outside of sprayer using a cloth and compatible solvent.
- Check hoses, tubes, and couplings.
- Tighten all fluid connections before each use.
- Clean fluid line filter.
Flush at the lowest pressure possible. Flush with a fluid that is compatible with the fluid you are pumping and with the wetted parts in your system. Check with your fluid manufacturer or supplier for recommended flushing fluids and flushing frequency.
- Follow Pressure Relief Procedure outlined below.
- Remove tip and guard from gun.
- If desired, remove fluid filter. Reinstall filter cap after removing fluid filter.
- Place suction tube in a compatible solvent.
- Turn regulator adjustment knob counterclockwise until it stops, and gauge reads zero.
- Open bleed type master valve.
- Flush hose and gun.
- Disengage gun trigger lock. Hold the gun against a grounded metal pail.
- Trigger gun, slowly open regulator adjustment knob until pump begins to cycle and a steady stream comes from gun. Trigger gun for 10-25 seconds.
- After solvent is running clean, turn the regulator adjustment knob counterclockwise until it stops and the gauge reads zero. The pump will stop. Once the material stops flowing, release the trigger and engage the trigger lock. Stop the pump with the rod buried in the pump.
- Close the bleed type master air valve.
- If flushing through the drain/purge valve.
- Place drain tube in a grounded waste pail. Open drain/purge valve slightly by rotating counterclockwise.
- Start the pump by rotating the air regulator adjustment knob clockwise until pump begins to move.
- When clean solvent flows from drain tube close drain/purge valve by rotating clockwise. Pump will stall.
- Stop the pump with the rod buried in the pump.
- Follow pressure relief procedure outlined above. Leave solvent in and store sprayer.
- Remove fluid filter and soak in solvent. Replace filter cap.
- Engage gun trigger lock.
- Close bleed type master air valve.
- Disengage gun trigger lock.
- Hold gun firmly against a grounded metal pail.
- Trigger the gun until pressure is relieved.
- Engage trigger lock.
- Drain fluid. To drain fluid, slowly open all fluid drain valves, including drain/purge valve, in system into a waste pail. If there is a return tube, open return line ball valve. Close valve after fluid is drained.
- If you suspect the spray tip or hose is clogged or that pressure has not been fully relieved.
- VERY SLOWLY loosen tip guard retaining nut or hose end coupling to relieve pressure gradually.
- Loosen nut or coupling completely.
- Clear hose or tip obstruction.
- Always flush the pump before the fluid dries on the displacement rod.
- Never leave water or water-based fluid in the pump overnight.
- First, flush with water or a compatible solvent, then with mineral spirits.
- Relieve the pressure, but leave the mineral spirits in the pump to protect the parts from corrosion.
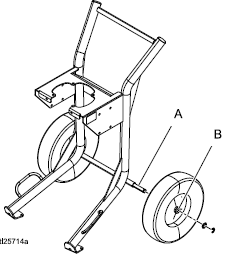
- Periodically lubricate the axle between points A and B with lightweight oil.
- Keep the cart clean by wiping up spills daily, using a compatible solvent.