ToughTek F340e Setup, Startup and Shutdown
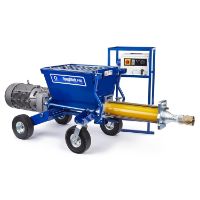
Learn how to set up, start and shut down your ToughTek F340e piston pump fireproofing sprayer. This pump delivers impressive spray performance thanks to its energy efficient direct drive electric motor and high output pump components.
Setup of the F340e
- Turn power off and ground sprayer (refer to manual, page 10). Plug the power cord into a dedicated 15 amp, 120 V circuit (or a 10 amp, 230 V circuit, depending on model).
- Check Throat Seal Liquid (TSL) level in packing nut. Fill 1/2 full with TSL.
- Connect air supply to applicator.
- Attach hose to applicator fluid inlet and pump fluid outlet, then secure Velcro straps around the cam lock fitting.
- Flush the system with water before using (refer to manual, page 12)
Startup of the F340e
Mix Material to Start
- Turn the flow adjustment know counterclockwise until it stops*
- Remove tip from applicator if installed
- Fill the clean hopper with material to be sprayed
- Place hose outline in 5 gallon waste container**
- Turn the power switch on and the 3-way switch to spray
- Turn flow adjustment knob slowly until water comes out and a steady stream of material flows from the applicator
- Install a tip onto the applicator (see applicator manual 3A3244).
- Turn on atomizing air and adjust the air needle valve on the applicator
- Turn the power switch on
- Turn flow adjustment knob until desired flow is reached
*Notice: To prevent material curing in system, never load material into a dry system. Loading material into a dry system will cause the material to stick to internal components and cure, causing damage and requiring replacement of those parts.
The applicator nozzle or tip must be removed during priming. Always push out any remaining water into a waste container before circulating material. Always circulate clean material back into the hopper for a few minutes before beginning to spray.
**Notice: To prevent damage to pump seals caused by cavitation, run the pump slowly until the system is primed.
Shut Down of The F340e
- Relieve pressure (see Pressure Relief Procedure, page 18).
- Turn the power switch off
- Remove applicator tip and tip retainer
- Place applicator outline into waste container and begin flushing system (See flush in manual, page 12)
- Turn power switch on
- Turn adjustment knob up slowly until a steady stream flows out of applicator
- Scrap material down when it is a few inches from the material inlet at the bottom
- Fill hopper with water as the material runs out
- When water begins to exit, turn power switch to off
- Clean out any remaining material in the hopper with water
- Turn power switch to on and open the fluid drain purge valve to flush material
- Once water is clean, close the fluid drain purge valve
- Turn the power switch to off and flush out remaining material with a hose clean out ball
- Remove applicator from the hose and wet down hose clean out ball
- Remove smaller diameter whip hose and the hose from the pump outlet
- Place larger clean out ball with the hose inlet and reattach the house to the pump outlet
- Turn power switch to on to continue flushing the hose
- Once larger clean out ball is out, turn off switch
- Next, place smaller clean out ball in smaller diameter hose and reattach
- Turn on power again and flush out hose
- Repeat until clean water flows out of hoses
- Remove hopper and drain remaining water from pump.
- Reattach pump to hopper and dispose waste material